Eura Evolution

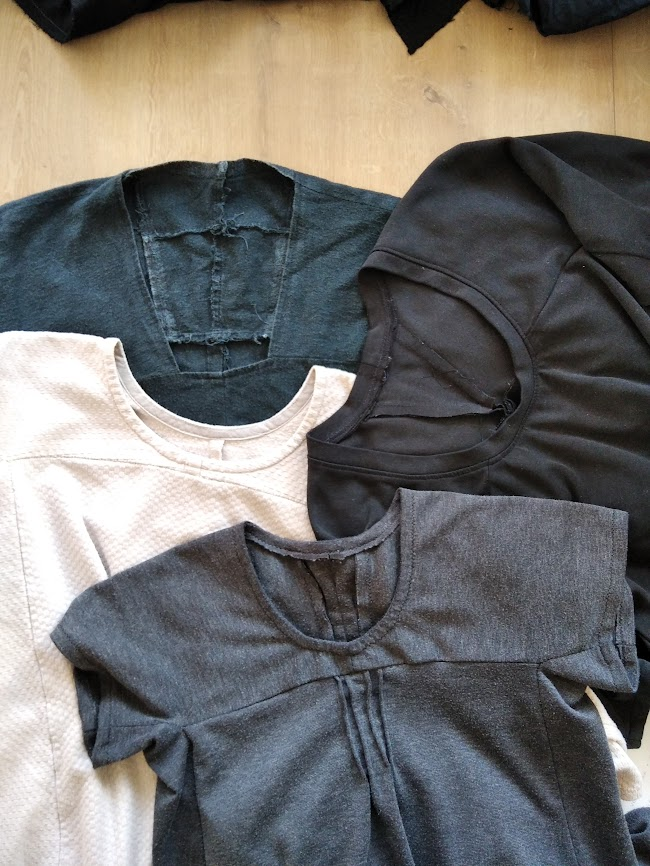
I mentioned in a previous post that I’ve sewn several dresses based on the Eura dress. In fact when I started pulling them out of my closet I was surprised at how many Eura-inspired dresses I actually have!

Eura Inspiration

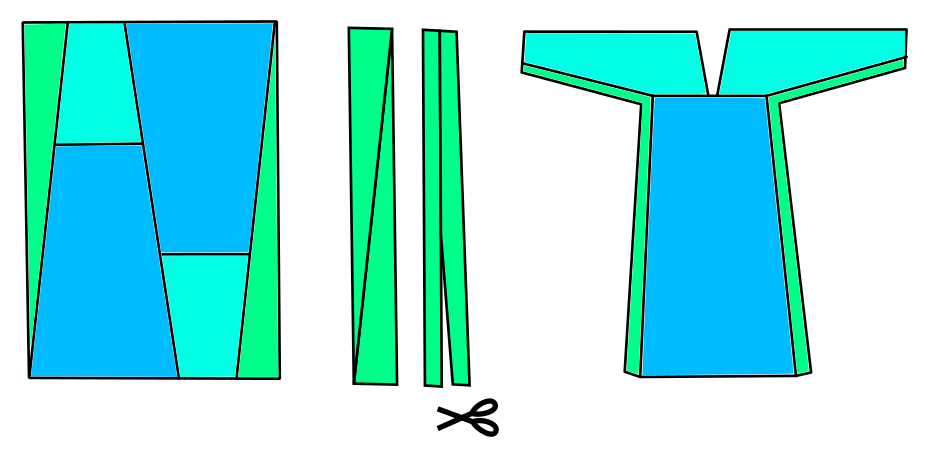
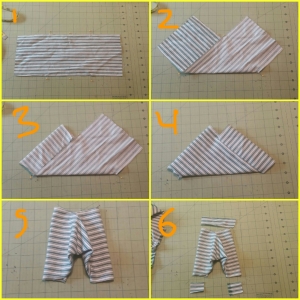
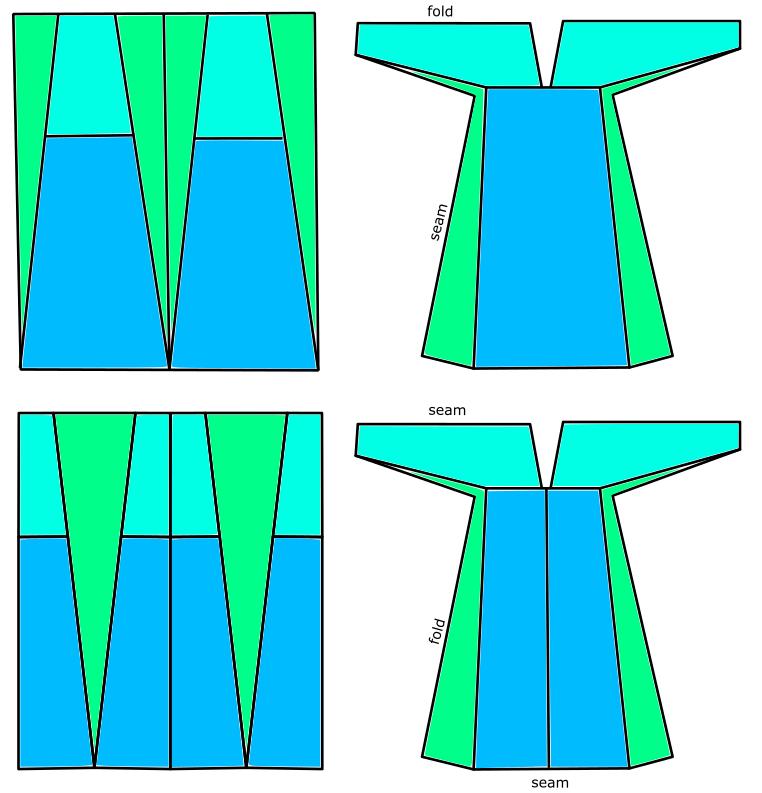
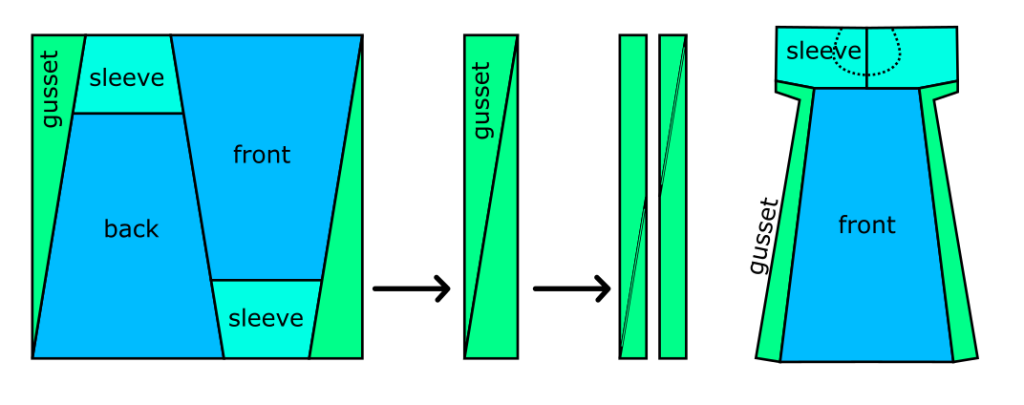
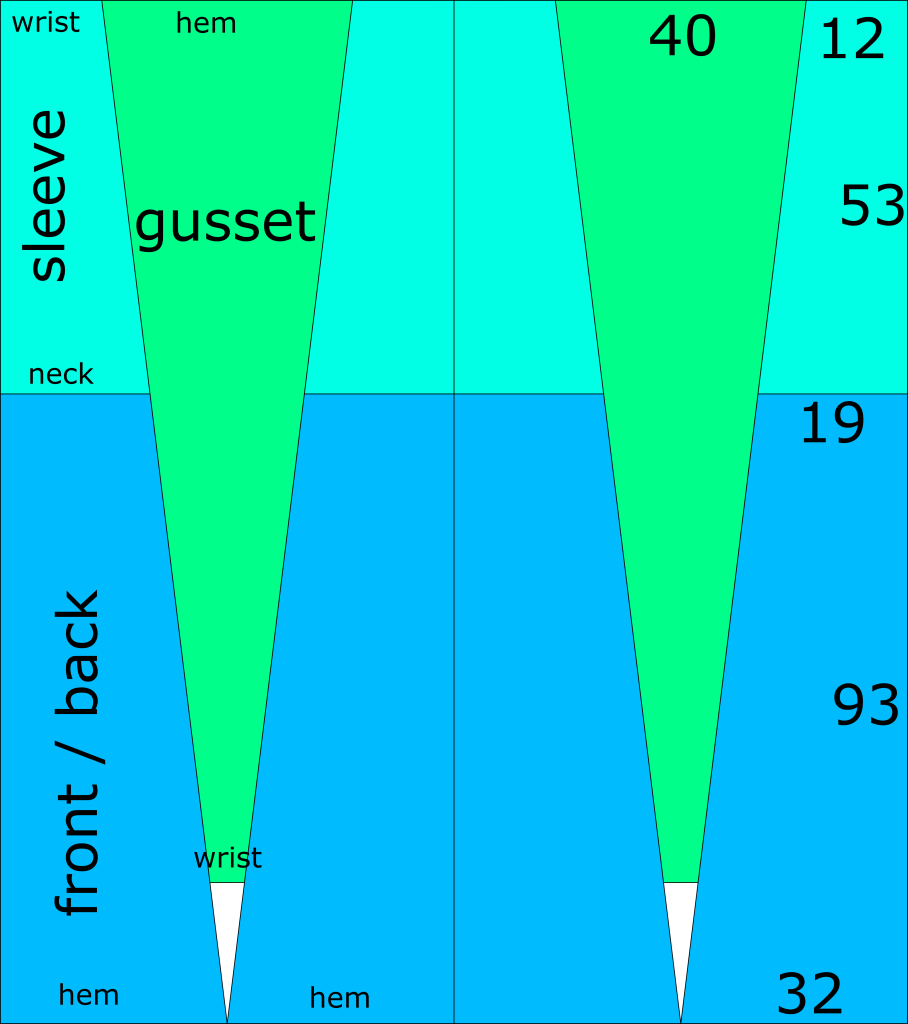
So, the original dress looked like this, a pretty basic, loose-fitting dress, made of three angled pieces.

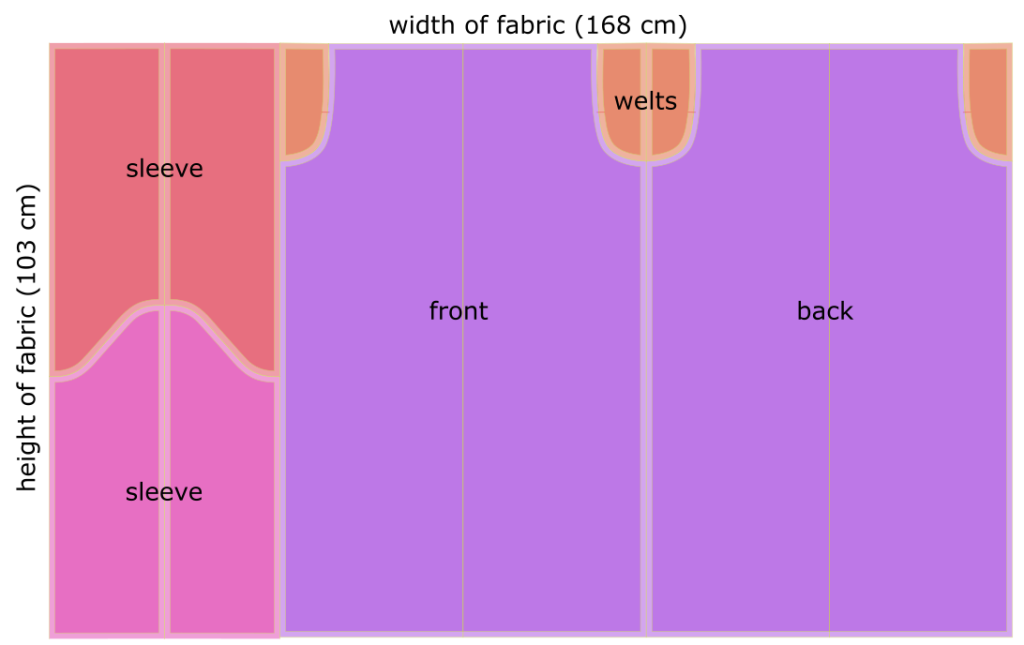
The back and the front are the same. There are some variations in how you can cut it, based on fabric width, and where you want your seams (on the sleeves and centers, or on the gusset).


This is a good article about the history of the Eura dress (actually an underdress!). Studio Faro has played with this pattern a bit, as has Liz Haywood.
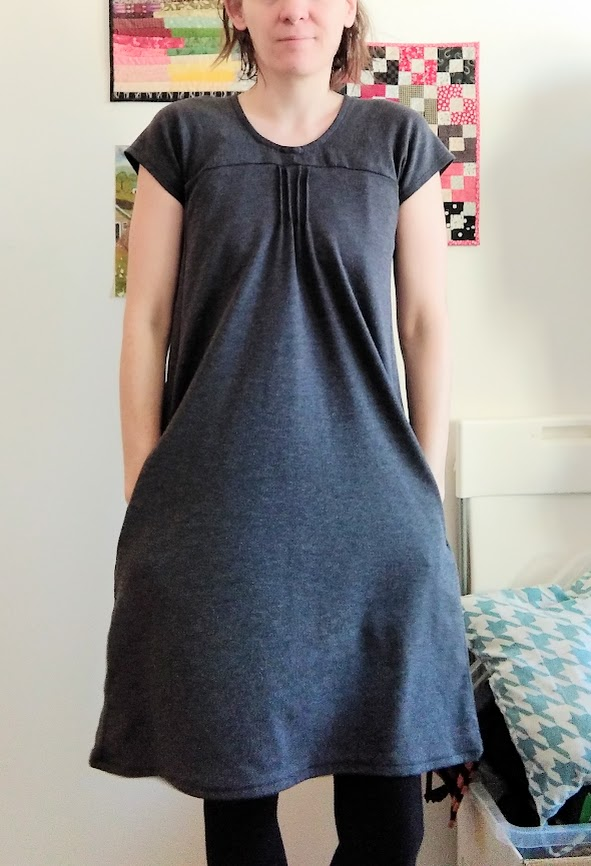
Eura #1: classic

The first Eura dress I sewed was pretty true to the original pattern, a very standard zero-waste pattern. In fact, it was everything I dislike about zw patterns: it was woven, it was loose-fitting, it was oversized, and it was boring. I added waist ties to help give it some shape; they did not help.

The only thing I did differently from the original was to fill in the back neckline with scraps.

The neckline is straight cut, so I just folded over the edges and hemmed. The sleeves were VERY tight so I had to cut them shorter. They are still too tight at the hem.

Eura #2: knit, short sleeves, straight-cut gusset

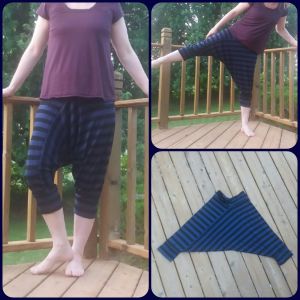
The second dress had some major changes, the most important being that I vastly prefer knit fabrics. So this and all future versions are knit. I changed the sleeves to a short sleeve, and I came up with the (fairly clever, if I do say so myself) idea of using the triangle cut-offs to make a more straight gusset – this makes the shape more like a normal A-line and less flowy.

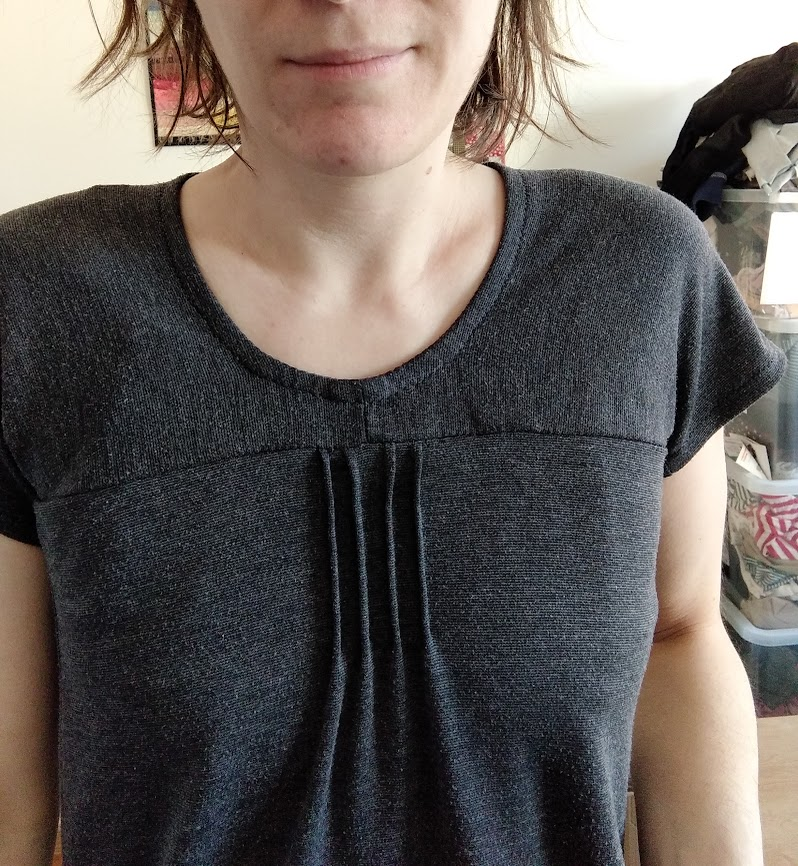
Just for aesthetics I added some pintucks at the front. Not with proper drafting, of course – I just yanked on the fabric until it stretched out and then brought it back in with the pin tucks.

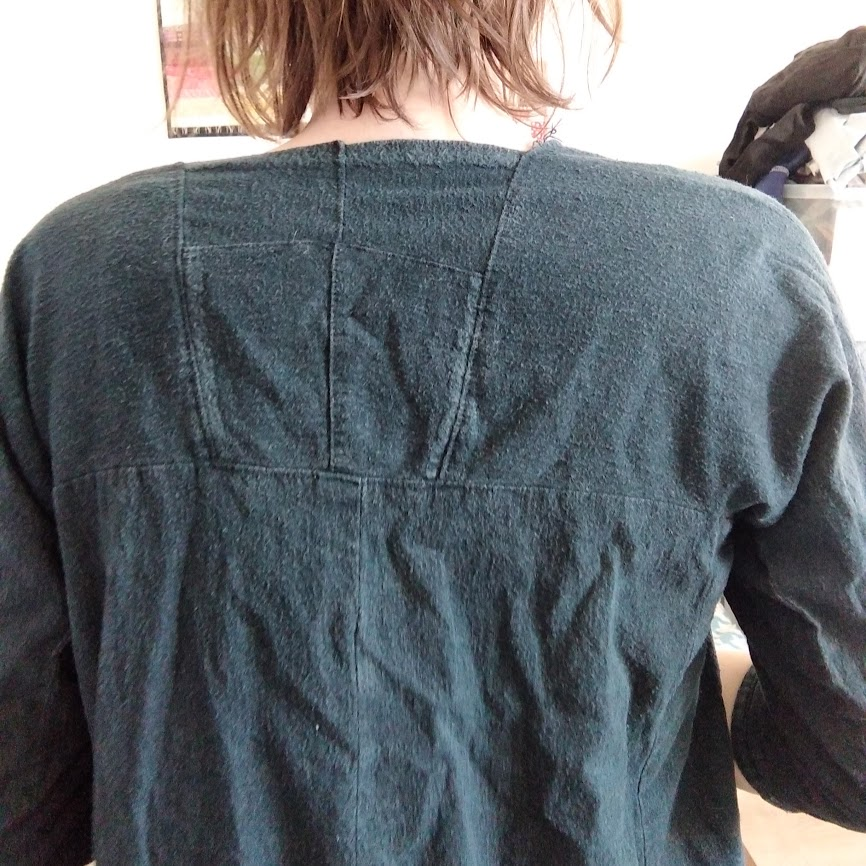
I also added an inset at the back neck. I have wide shoulders and a wide back, so this makes the shoulders a little more comfy, and pushes the sleeves slightly to the front (similarly to how a standard armscye is less curved at the back, so the sleeves angle towards the front, since your arms spend more time in front of you than behind).

In all the knit versions I abandoned the straight neckline and cut a standard curved one. This one is finished with a band of fabric on the inside, which was a terrible idea – future ones use a standard band, or bias binding on the inside.

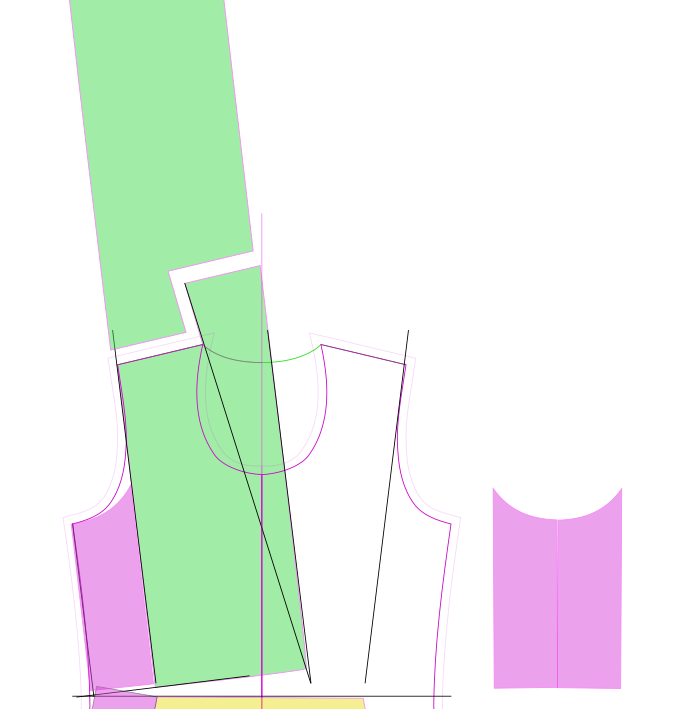
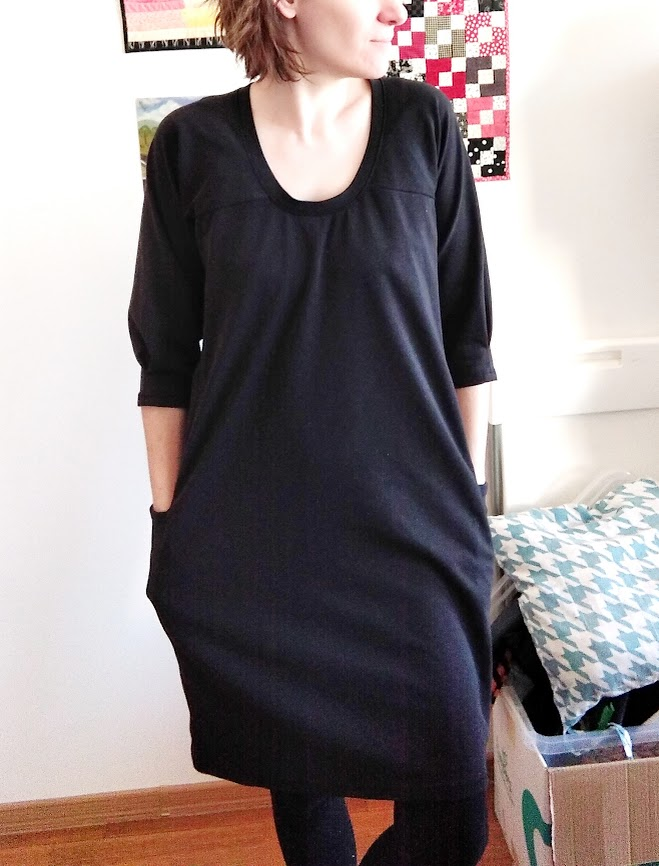
Eura #3: tapered gusset, in-gusset pockets

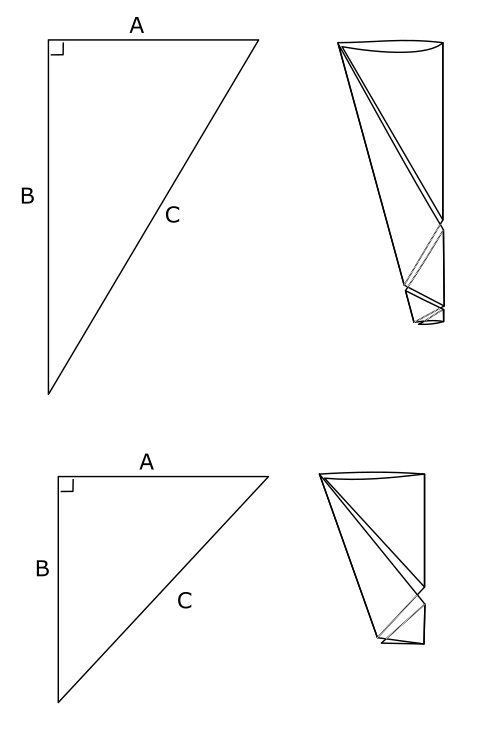
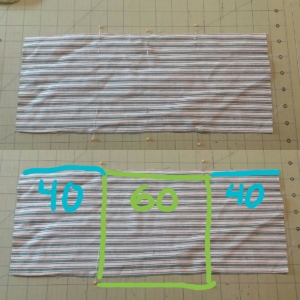
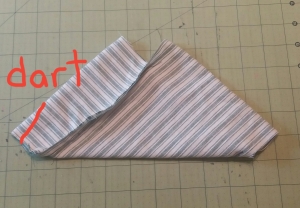
The major change in this version was the shape of the gusset. In this pattern the majority of the shaping comes from the gusset, so let’s look at the shapes a little closer.

  • In the first version the gusset was a triangle – the resulting dress is VERY flowy at the hem. 
  • In the second version the gusset was a rectangle / strip – the dress is A-line.
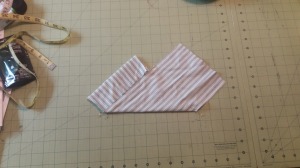
  • In this third version, the gusset is tapered at top and bottom – the dress is fitted.
  • In later versions I mathed a little harder and worked out how to not have the points of the gusset chopped off.

The previous versions had standard in-seam pockets. This one has horizontal pockets in the gusset. Here they are seamed, somewhat clumsily, in later versions the whole gusset-and-pocket is cut as one piece.

The three-quarters length sleeve was a little loose so I pleated it before hemming.

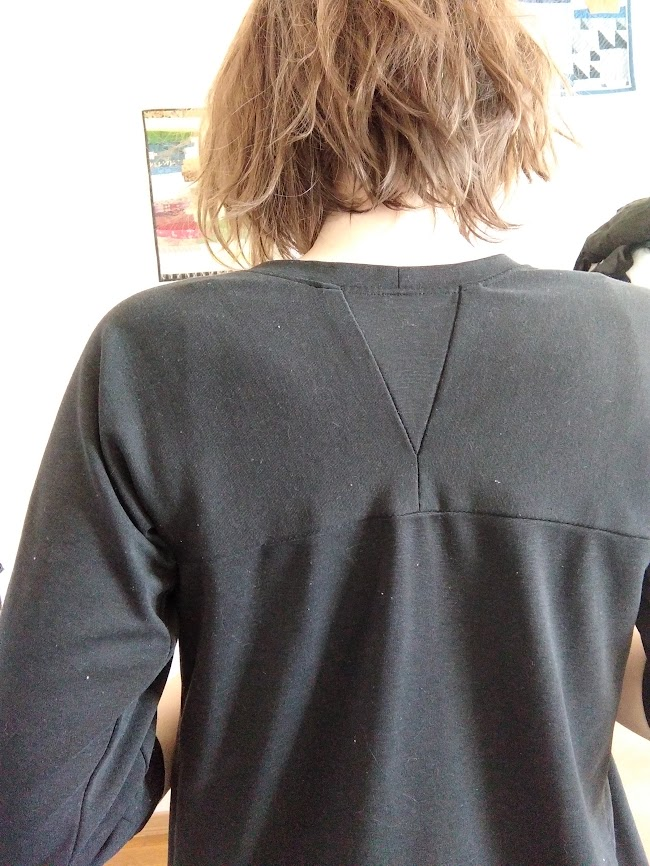
This version also has an inset at the back. You can see that for this version I used a standard neck band.

Eura #4-5: better fit, better gusset and pockets, better sleeves

The next versions were just refining the third version. The refinements worked and I sewed two of the same – it turned out to be a lesson in how important fabric choice is! The pink-beige fabric has very minimal stretch, it’s something like sweat-shirt fabric, and the plaid version has more than 50% stretch – at the neckline especially you can see the difference, and I can feel how much tighter the armscye is on the pink one.

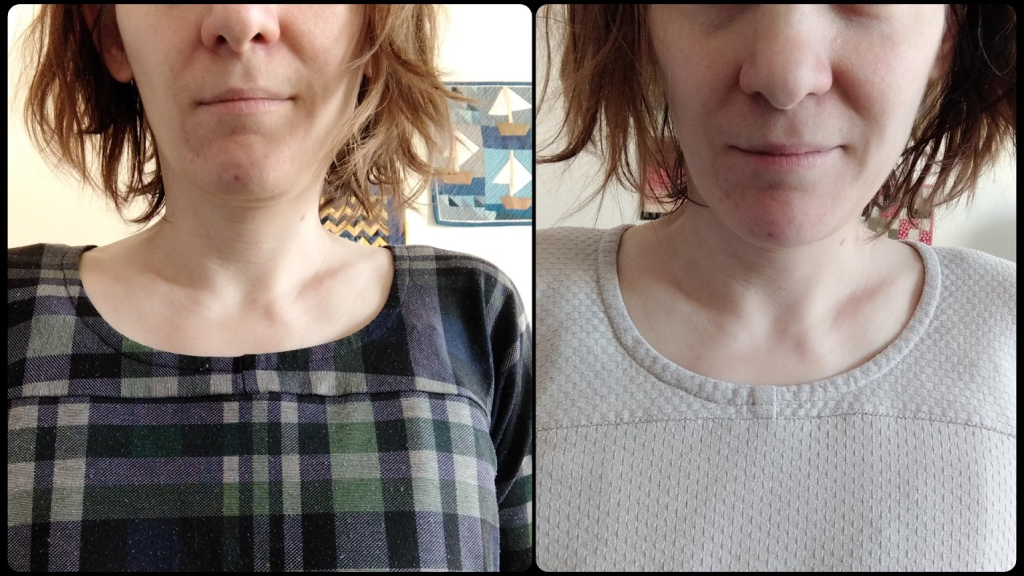
The necklines of both of these are finished with bias binding. 

I refined the math a little (ahem, thought about it beforehand instead of just jumping in with the scissors) and cut the whole gusset and pocket as one piece. 

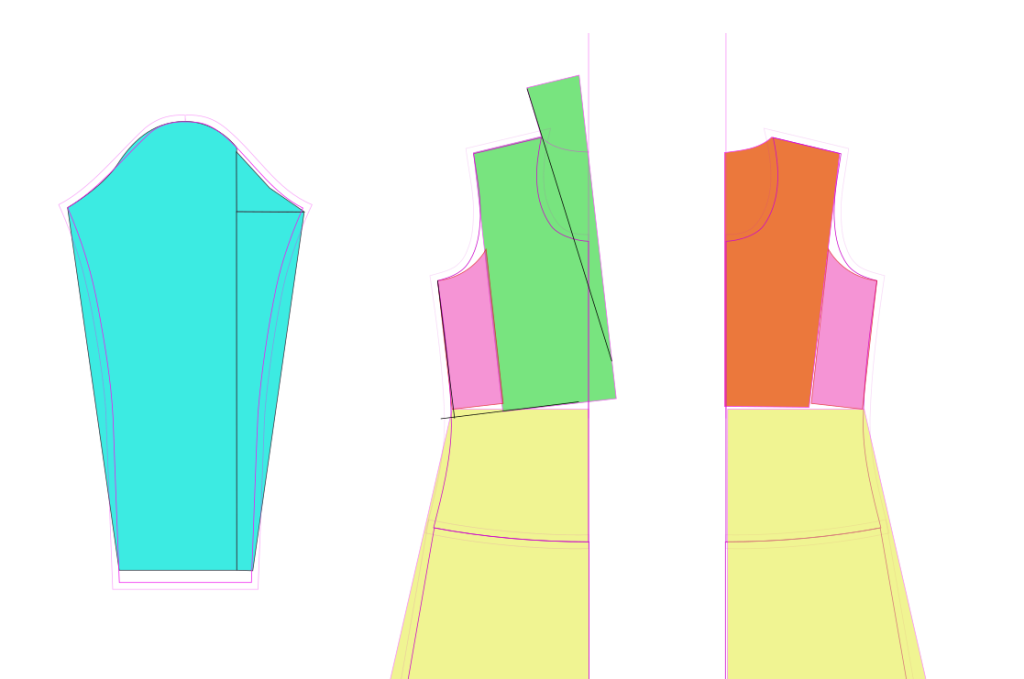
Not-quite-Eura #6 – Marshall Top

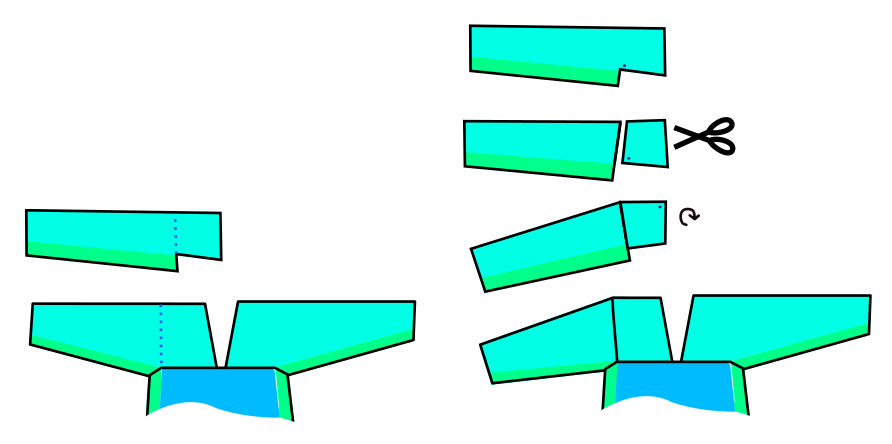
This is a pattern I’m still working on but I want to show it here because the dress just keeps evolving! When the gusset is square-cut, there’s no reason it can’t be cut as part of the sleeve and top. It leaves a chunk where the “sleeve” part of the sleeve meets the “shoulder/yoke” part of the sleeve…

… so what if you put a seam there? And if there’s a seam there, maybe we can angle it, so that the sleeve ends up at an angle, not straight like a T?

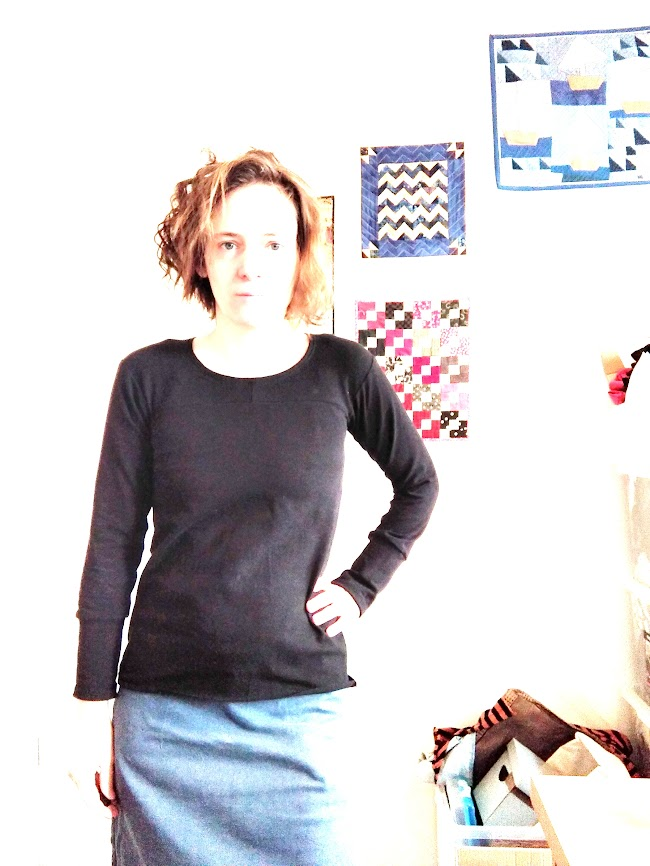
It ends up like this, a very standard-looking knit top!

Patterns

If anyone happens to be a EU 38-40 (medium, bust 84-86) and wants to make your own, here are the patterns I used! At some point in the future I want to have a go at grading them to multiple sizes but, as I’ve said before, we’ll see.

The “original” Eura dress, made for woven fabrics:

A short-sleeved A-line version for knit fabrics:

A long-sleeved version with a more tapered skirt, again for knit fabrics. I’ve made it in two different knits and while both are comfortable, the stretcher knit is far more comfortable around the armsyces!

Happy sewing 🙂

Shawl Collar Wrap Dress

Concept / Ideas

I was looking through shawl collar drafting tutorials and look at this, doesn’t the shape of the collar just cry out to be tessellated?

But it works even better if you add a seam – the front/collar can tessellate nicely with itself:

And what to do with the side underarm? Tessellate it with something else? If the underarm curve is concave and the sleeve head curve is convex… hm…

Pattern

The pattern I put together looked like this. The bodice is made of three pieces – the front/collar, the back, and the sides. There is no seam at the side, just where the side panel joins to the front and back. There is a dart in the back pieces so that it can be cut straight, then nipped in at the waist.

And here’s how the pieces go together. The backs have a bit of off-cut at the neck and shoulder. The front pieces tessellate together. The side pieces can tessellate with the sleeve cap, and the sleeve has been separated into three pieces so that it takes up less space. Most of the leftovers (in red) can be joined together to make a strip, which can be made into two pockets.

It’s fairly modular, which means the pieces can be moved around depending on fabric width.

Cutting – Sewing 

I made a muslin of the bodice and sleeve before cutting my good fabric, and ended up taking a few cm off the width of most pieces (too much, as it turned out). When I actually measured my good fabric, it turned out to be extra-wide, which made cutting easier. Somehow I did mis-measure how wide it was and my skirt pieces ended up too narrow, so I cut an extra strip to go at the center back. Luckily in this fabric nothing shows!

Results 

Not bad! The fit is good although a wee bit too tight, I think because my muslin fabric was stretchier than the finished fabric, and also just because I over-fitted it. I also underestimated my A-cups and probably should have added a small bust dart or some shaping. This could be done either by widening the front piece to add a vertical dart (which would mimic the dart on the back) or lengthening it to add a Dior dart, which I think would suit the style of the dress (although again with just a slightly looser fit it might not be needed).

And I decided to copy Chris Nelson and weigh my fabric to see the amount used and wasted – so much easier than trying to figure out cm2! The majority of the waste is from cutting off the horribly curly edges of the fabric and trying to straighten it, because the print is way off grain. What’s the solution to this? Buying better fabric I guess?

Lessons

I am thrilled with how well this sleeve / underarm worked out. It’s fitted, but still has a full range of movement. The shape is similar enough to a standard sleeve pattern that (I hope) someone who doesn’t know zero-waste patterns wouldn’t find it too weird or off-putting. It’s not totally zero-waste but maybe could be tweaked? And a quick mock-up looks like it works in a full range of sizes!

I was worried about how noticeable the seaming would be, both visible and how it would feel, but it was so un-feel-able that I totally forgot about it, and had to go back and get a photo later! In this pic you can also see the side panel and side seam, or lack of it.

If anyone is a similar size as me or better yet slightly smaller (I am a bust 85 waist 71 hips 98, approximately EU 38) and would like to give it a try, there is a pdf of the cutting layout here. At some point I might get around to grading it and writing up instructions but no promises.

Triangle Tubes

Let’s talk tubes! I’ve written about them before and wanted to re-visit the “tapered spiral tube” I wrote about before. I think “triangle tube” is a better name now and the concept it still one of my favorite ones!

Basically you take a triangle and wrap it around itself, and you end up with a tapered tube. A tapered tube is a great shape to have since so many of our body parts fit into them so nicely! For example Nau’s Lotus Trousers and Make/Use’s Spiral Trousers are made with this technique. Liz Haywood experimented with using this technique for the sleeves on her Tie-Front Top.

The shape of the starting triangle affects the finished tube. The shorter and fatter the triangle, the shorter and fatter the resulting tube.

And because this is such a useful technique, I’ve worked out a handy-dandy calculator for triangle tubes! Basically, you can input the size of your starting triangle, and the calculator will tell you the dimensions of your finished tube. These are flat measurements – ie, the measurements flat on paper/fabric, not the distance around. A “bottom” measurement of 10 for example means an opening of 20.

These measurements do not include any seam allowance. It’s easy(-ish) to calculate that horizontally, the tube has 1 seam allowance so it will be that much narrower (not exactly by the width of the seam allowance, its actually the seam allowance cut on an angle, but within 1-2 cm). Vertically it takes more guesswork and depends on how many times your triangle wraps around. A long skinny triangle that wraps around itself multiple times will lose seam allowance multiple times.

The calculator also includes three “across” measurements, which are the flat measurements at 1/4, 1/2, and 3/4 of the way down the tube. Useful if you want to know the circumference (which remember is double the flat measurement) at the elbow of your sleeve, or at the knee of your pants!

Happy sewing!

Zero Waste Basic Knit Top

Concept

In short, I wanted to challenge the assumptions that zero-waste patterns are over-sized, loose, eye-catching art pieces made from woven fabrics. What better way to do that then by creating a simple fitted knit top?

Development

A long time ago, I made myself a Eura dress. This is a pretty basic zero-waste pattern, basically made of three angled pieces.

The back and front are the same. There are some minor variations in how you can cut it and sew it together.

It was made from woven fabric and followed the lines of the original Eura dress pattern. It’s fairly loose fitting, and gets more and more flowy towards the bottom.

Gradually I’ve realized that I strongly prefer to wear knit fabrics. So I worked out a closer-fitting Eura-inspired pattern for myself, which included narrowing the skirt in. I’ve made a handful of this same dress in various knit fabrics and they are some of my most-worn dresses.

Later I decided that the triangular gusset could also be a rectangular gusset – I don’t need the extra width in the skirt, nor the narrowing arm, and it has the added bonus of making calculations easier.

In the original Eura, the underarm gusset triangle tapers to an end either at the sleeve cuff or in the sleeve seam. With the rectangular gusset, the two side seams run parallel all the way from cuff to hem.

And if the gusset is a rectangle, it can be cut as one piece with the front/back and sleeves. I like this because it mimics the single underarm and side seam on “normal” knit tops, although the little cut-out bit is more awkward for cutting.

This T-shaped top is fine in something like a sweater, or anything looser-fitting, or in children’s clothes. But in a closer-fitting top the armhole wrinkles get uncomfortable, so I was curious if I could add some shaping to change the angle of the sleeves. My idea was to simply chop it at an angle and rotate it. I was hoping this would have the bonus effect of looking just like a regular shoulder seam.

Sewing – Results

The finished pattern looked something like this.

It worked! Again I used the tiny scraps from the neck hole cutout to make a band for the neck, and although the narrow band (2.5 cm cut) was fiddly to work with I think it looks great.

I’ve up-ed the exposure to try to make the details of the shirt more visible but there’s not much to see. It’s a truly unremarkable black knit top – exactly what I wanted!!

For it to be perfect I would want it a couple cm longer in both the sleeves and body, but this is still a totally wearable garment, and I see a lot of use in its future! In fact I put it on just to take photos and then decided not to change back 🙂

Future

Can you imagine cutting this out from several different coordinating fabrics and color-blocking? I can’t imagine a situation when I suddenly needed a bunch of new shirts, but hmmmm maybe in children’s sizes, for a child who’s just outgrown his current wardrobe 🤔🤔

Zero Waste Tucked Dress

Hi all! I’m dusting off this blog (and wow was it dusty) to talk about some recent zero-waste projects I’ve sewn up. First up is this cozy knit dress.

Concept

In this dress I wanted to try three concepts. First was the idea of cutting the armscyes and sleeve heads pretty much exactly like they are on a non-zw pattern. So no squaring them off, no weird shapes, etc. Basically the only changes were to make sure the sleeve head was symmetrical, and to straighten the shoulder line.

Secondly I wanted to try a tessellated sleeve head – the curve of the sleeve head is the same both front and back, as well as rotationally. The top curve of one sleeve head is the bottom of another. 

The third idea here is using tucks to shape the garment. Originally I planned to do it just on the sleeves but since there’s no point in sewing just a sleeve and not attaching it to anything, I decided to tuck the dress as well.

Pattern – Cutting

The pattern is very simple, taken from a well-fitting knit top. Not too many pieces involved and I think it’s pretty clear what they all are. The pattern is flexible in that wider or narrower fabric the dress part could be cut wider or narrower.

Sewing

Tucks, tucks, tucks. So many tucks. If I did it again I would put them closer together, especially on the sleeve, which although it might be harder to sew would also make it more visible and nicer looking I think. It was pretty heartening to see how nicely the tucks worked to shape the first sleeve though!

The order of sewing was nothing special:
– make the sleeve tucks
– make the tucks on front and back
– shoulder seams
– neck – the neck is a standard banded neck, the band is pieced together from the neck hole cut-out
– sew in sleeves
– side seams
– (decide the whole thing is too loose, so more tucks on the front and back. Since I had already finished the neck the new tucks go up to the shoulder, which was a mistake because the shoulder seam has been pulled in)
– make welts
– make pockets (the pocket bags are scraps from another project)
– (decide that the sleeves are too short and, conveniently, the dress is too long, so a strip off the bottom because cuffs, and I hemmed with a very tiny hem)

Results – Lessons

Overall a very successful project! Using the tucks as shaping worked wonderfully on both the body and the sleeves (with the exception of the extra tucks added later pulling the sleeve seam in. Well, that would have been solved by more planning BEFORE sewing but oh well.)

sleeve seam too high 😦
great pockets though!!

One thing I hadn’t expected but really liked is how cutting the neckband from the neck hole scraps gives you a very limited amount of fabric and therefore a very narrow neckband. Trickier to sew for sure but lays nice and flat!

the amount of fabric I had for the neckband

Very tiny pile of scraps left over, offcut from trimming seam allowances in the welt, and a bit from the neck hole. If I measure it generously it’s approximately 180 cm2, so 1.1% of the total fabric used.

FAQ – Frequently Asked Questions

Here are some answers to some of the most commonly asked questions about the Empty Hanger Patterns shop on Etsy.

Where is my pattern?

To access your digital file(s), go to You > Purchases and reviews and look for the order. To the right of the order, click Download Files. This goes to the Downloads page for all the files attached to your order. You’ll need to do it on a desktop via an internet browser, currently you can not download files via the Etsy app. You can download using the internet browser on your phone, sometimes, if you switch to “desktop mode” or “desktop site”.

If your payment is still processing, the Download Files button will be gray.

My test square doesn’t measure right?

Here’s a couple of things you can try:
– double-check if you’re using A4 or letter paper, and have the right file. General letter-sized paper is used in North and Central America, and A4 in the rest of the world.
– change your printer settings (try “actual size” vs “100%”, turn on/off “choose paper by PDF size”)
– print from a different program / device
– measure with a different ruler (especially if using a tape measure, sometime they can stretch out over time)

Can I get the updated pattern?

Of course! All I need is:
– which pattern you’re looking for
– proof of purchase
– current email address

Can I get a refund?

Digital files can be refunded only if they have not been opened / downloaded.

Are there any videos available?

Check out our YouTube Channel here. As of writing, we have videos for some of our newer patterns, which are the Fair Play Top, the 64 Shirt, and the Marshall Set

Lazy Pants

Did anyone else get called lazypants a lot when they were growing up? Well today I’m owning it! These lazy pants are one of the best things I’ve sewn all year and I am thrilled to write up this tutorial so everyone can share in the #lazypants magic!

Before we get started I have to admit that these are absolutely not my original idea; I’m pretty sure this is something I saw on Pinterest years ago. I’ve seen them sold in Hungary as Turkish pants; a commenter in a sewing group I’m in mentioned they look like traditional Hmong mens pants; if anyone knows anything about other origins please drop a comment! I googled a bit but it was hard to find any non-sales pages and I’m really curious.

So the pants are made of one piece, plus a waistband and two cuffs. And they can be made in three steps:

1. Find your measurements. You’ll need two measurements for these pants; one is easy to find and the other needs a bit more thinking. The easy measurement is the length (green in the pic below). Measure along your outside leg for as long as you want the pants to be. Don’t include the waistband or the cuff in this measurement (for these shorter pants, for me this measurement was 60 cm).


The second measurement is the leg and waist opening (blue in the pic above; on this pair for me it was 40 cm). This measurement involves a bit of guess work: you’ll need a measurement not too much bigger than your ankle / leg circumference, and also not too much bigger than half your waist circumference. And, if you’re sewing a woven, also big enough to fit over your hips, if they’re significantly bigger than your waist. Since not everyone’s leg circumference is perfectly 1/2 of their waist circumference, this may involve some fudging – the easiest way is to overestimate the opening a bit and gather in the excess to the waistband and cuffs, but read to the end for some alternatives.

2. Cut and fold your rectangle. Cut out a rectangle with the dimensions (length) by (length + opening + opening). For me that was 60 cm by (60+40+40) 140 cm. Mark a square in the middle of the rectangle – the length of each side of the square should be your length measurement.

Draw an imaginary line from one corner of the square to the opposite some and fold your fabric right sides together along this line.

Then fold the “legs” in to match and sew.

3. Add cuffs and waistband. Okay I lied, there is a tiny bit more measuring involved, but this is one you can totally just eyeball – how wide do you want your waistband and cuffs to be? How long they should be depends on if you’re using a knit or woven fabric. For wovens, cut the waistband and cuffs the same length as the opening, and add elastic (to the waistband at least; elastic in the cuffs is optional). For knits, you can also cut the waistband and cuffs to match the openings (and also add elastic if needed), or you can cut them smaller and stretch to fit (don’t forget to use a stretchy stitch!).

Optional: more fudging. An easy way to make the leg opening smaller is to make a dart along the outside seam.

Of course, the same thing can be done at the waist to make it smaller. To make the waist bigger, cut it into a deeper V . Curve it so that the point of the V is still 90° or more; a sharper angle will be harder to sew.

And where’s the pockets? Well the first version was really a lazy version, the second was just for the sake of photos, but never fear, the third version will definitely have them! I’m debating between patch pockets, or inseam pockets in the waistband seam. What do you think?

Also, what’s next? Should I make (a) matching lazy pants for the whole family or (b) a lazy pants jumpsuit?

Inkscape for croquis: Part 2

In part 1 we covered how to make a photo of yourself into a personalized croqui using Inkscape, a free drawing program. Now we’re going to add some clothes and learn how to mix and match them! (and Part 3 will be some finishing touches and extra tips.)

Open up the document with your croqui in it, and open the Layers options from the Layer menu.

Right now you only have one layer; right click on it and rename it to something like “croqui” or “base” or whatever.

Use the plus button to add a layer, and name it leggings (or pants or skirt).

Draw an outline of a simple leggings or pants or skirt. The open the Fill and Stroke options (Object -> Fill and Stroke) and use the Fill options to color your leggings,

You might end up with something like this. This is because the line you drew the leggings with isn’t one complete line, but a series of shorter lines. There’s no problem with that, in fact that’s how I draw most things because it’s easier, but we have to connect up all the small lines.

Select all piece of your leggings (click and drag with the arrow, or press control + A on the keyboard), then switch to the edit nodes tool (under the arrow). Select two of the nodes which are close to each other and use the “join nodes” tool. This will join them into one. Continue around your outline and anywhere there are two nodes close to each other, join them into one. You’ll end up with a complete outline and be able to use the fill tool.

Or let’s learn another way! Hide your leggings by clicking on the little eye in the Layers options. Then create a new layer with the plus, name it shirt or top or whatever, and draw yourself a top.

Hide the layer with the croqui…

…and then use the fill tool to fill in any areas you want colored on your top.

Turn on all your layers again and admire your croqui in their new outfit!

One last trick for today: play with the arrows under the list of layers to move the layers up or down – for example, if you want your shirt to look tucked into your pants, move the shirt layer to under the pants layer. And if that ends up looking a little strange, don’t worry – part 3 will be about fixing that, and some other troubleshooting and tips.

Promising patterns: Haza Kaftan

Part one can be read here. Bit of a name change since part one because I’m getting more enthusiastic about being able to develop this into an actual pattern for sale! So to recap, this was the inspiration:

Printing Women Summer Loose Casual Irregular Floral Blue Dress - Buykud

image 0

And at the end of the previous post I was about to use the lovely squares on this plaid version to see if I could reverse draft the pattern. I ended up with this shape:

Aha! This shape is familiar! This is loosely the same shape as every other similar garment from the previous post. My original cardigan:

And my twist-neck top (second picture from the tutorial I used, since I don’t know where my own pattern is:

This Burda dress is the same:

And back to the original:

The original front has an extra piece making the in seam pockets possible. But it’s just a flat seam, it doesn’t add any shaping. So I cut my pattern apart and made a tiny little muslin to see if the worked in practice as well as in theory:

Not bad! So I tried out a full-sized muslin. I didn’t take pictures, so this is just a shot from the video I made to look at the fit (not having a full-sized mirror nearby). The pieces were very big and very white, about which my husband in the background there had several choice comments: “What are you sewing?? Curtains? A tent? Sails for a ship? Her Majesty’s HMS Muslin?”

In the end I added darts to make the construction easier and to add more fabric at the front. And then it was time to print out this monster of a pattern…

… and sew it up! I didn’t want to invest a whole lot of money in a first version so I went with some cheap chiffon-y stuff. What’s worse than sewing delicate slippery chiffon? Sewing cheapo delicate slippery “chiffon”. It stretched and squirmed and gathered under my stitching; halfway through I gave up on ever getting a wearable garment out of this and just kept on to see the final result. BUT LOOK:

How great is that?? Even in this terrible, unpressed, puckery fabric it looks good; can you imagine how great it would look in a half-decent fabric?? In fact, I’m thinking that there aren’t too many things I would change to the pattern. Adding pockets, of course, and changing how I sewed some of the seams so that the insides turn out nice and neat. And NOT USING CHEAP CHIFFON. What do you all think, is there anything else that could be improved? And who wants to help me pattern test it??

Inkscape for croquis

Recently in one of my favorite facebook sewing groups the mybodymodel.com croqui-making service has been talked about a lot. Basically you put in a bunch of your measurements and then it gives you a custom croqui – an outline of your body which can be used for fashion drawings. It worked moderately well for me, but it couldn’t get my breasts right (I’ve seen several people complain that their breasts aren’t as wide-set / hanging-over-arms-y as My Body Model wants them to be) and I’ve yet to meet the pattern that can match my super square shoulders.

Version 1 and 2 of My Body Model, and my own croqui

And of course if you actually want to download a usable, un-watermarked croqui it costs $29 – a drop in the bucket for some, but I’m both stingy and living on a Hungarian teachers salary, so it’s a meaningful amount for me. However! My love of penny-pinching is balanced by my love of DIY-ing everything… so I made my own croquis!

I’m using Inkscape, a free and open-source vector drawing program. I think it’s a great program, very user-friendly and intuitive. So first step, go download and set up Inkscape.

Image result for inkscape logo

Next step: get naked! No, really, strip down to your undies and take a few pictures of yourself. Try to get shots from around waist-height – having the camera too high or low can distort your proportions. A simple pose is best, and try to make your background something that contrasts with your body.

Open up a new Inkscape document, and then File -> Import your picture. In this part of the tutorial I’m using, obviously, a stock photo.

Use the Zoom Tool to zoom out a bit and make sure your picture is on the page, and that it mostly fills the page. If it’s not, use the arrow tool to move it around and resize it.

There are two tools you can use to trace yourself, the Pencil tool and the Bezier Curve tool. Play with them a bit and see which is easier for you. Of course you can also use a combination of the two. In the image above, the shoulder on the left was drawn with the Bezier Curve tool, and the shoulder on the right was drawn with the Pencil tool.

If you double click on any line (path) you’ve drawn, you can see how the line is broken into segments, joined by nodes (the dots). You can drag the nodes to adjust their position, and smooth them out using the options on the top tool bar.

This nice white lady on a white background is pretty easy to trace, but if your picture is darker you might have problems seeing the lines you’re drawing. In the Options menu open Fill and Stroke. With the picture selected, lower the opacity until you can see a bit better.

How much detail you put on your croquis is totally up to you. I like to draw a simple hand, but I usually avoid doing a face because, wow, that is creepy.

When you’re happy with your tracing, go ahead and delete the photo. Then select all of your lines and use Object -> Group to make them into one object.

Last but not least! Go back to the Fill and Stroke options and play with the Stroke paint and Stroke style – you probably want to make the width of your stroke at least 1 mm, and the color should be as dark or light as you like – depending on how much you want the croqui to show when you start drawing over it.

And you’re done! Now you have two choices: print out a few, break out the colored pencils, and start drawing… or check back later for the next part of this tutorial, which will be about how to draw clothes and layer them up Inkscape. In the meantime, practice drawing more croquis! What about a half-side view? Or a back view?

Happy sewing (and drawing!)!